Building The Leaning Tower
of Pisa in Bryce Tutorial
Carl E Schou
January 31, 2002
|
|
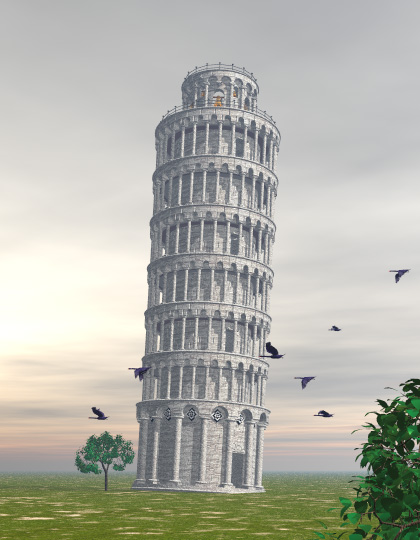
The Tower and the Swans
Ever wanted to
own one of the real architectural treasures of the world, but
didn't have the money or the room for it? Not to
worry... you can build it in Bryce!
When people
first think of the Leaning Tower of Pisa, the first thing that
usually comes to mind is the fact that it's leaning. It's
easy to overlook the fact that the tower is a beautiful example of
Romanesque architecture.
There's a lot
of steps involved in this project and it will probably take a
couple of sessions to complete it. Before you start, I'd
recommend that you print out this tutorial so you can check off
the steps as you go.
|
|
|
History of the Tower
What is now known
as the Leaning Tower of Pisa, was built to be a bell tower (Campanile)
for the Cathedral
on the Piazza dei Miracoli in Pisa. Construction began in 1173
and stopped five years later when the tower began to lean to the
north as the supporting ground began to settle. At this point
the tower was only three stories tall. Construction was
resumed around the year 1250 and attempts were made to correct the
lean by curving the tower and using thinner columns on the downward
side. By the time the top story (the bell chamber) was
completed around 1350, the tower was leaning to the south.
Early
in the its history, it was popularly thought that the tower was
leaning because one of the original builders had been a hunchback. If
you've ever read the headlines in a supermarket tabloid, you'll see
that people haven't changed that much.
The
tower is also supposed to be the site of Galileo's experiment with
gravity, in which he dropped two balls of different weights to prove
that they would fall at the same rate because the acceleration due
to gravity is a constant.
Many
attempts have been made to straighten the tower. In 1934,
Benito Mussolini tried adding weight to the base, but that just made
things worse. In
1990, the tower was closed to the public because the lean was
increasing. It was recently reopened after work on the
foundation was able to restore the building to the lean it had 30
years before. |
|
|
Architectural Details
The tower is
faced with white marble. It is 185 feet (55.8 meters) tall and
51 feet (15.4 meters) wide at the base.
There
are eight stories, or levels (loggias).
The
bottom story has 15 columns.
The
middle stories have 30 columns.
The
top story has space for 18 columns, but the space for every third
column is taken by a bell window so there are 12 columns.
The
weight
of the tower is 14500 tons.
The
angle
of lean is 5 degrees. |
|
|
Modeling Strategy
To build our
tower, we will use Boolean primitives in Bryce. Unless stated
otherwise, the Veiny Stone texture will be used for all parts,
positive and negative.
We'll use the multi-replicate command a lot. In all cases,
we'll do the replication about an origin placed at X and Z = 0.
We'll simplify
things a bit by modeling just three stories: the bottom level, a
generic middle, and the top level bell chamber. We'll use a
separate Bryce scene file for each of these stories. This will
help keep things sorted out and minimize memory requirements during
construction. We'll then merge these parts into a single file,
ready for landscaping and rendering.
|
|
|
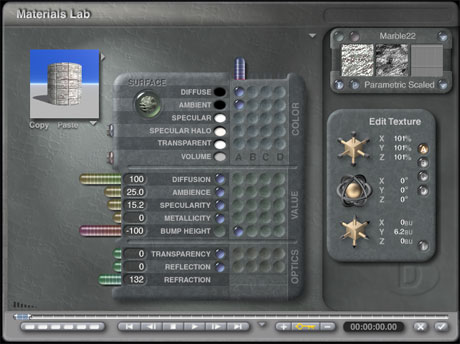
Bricks in Bryce
We'll begin by
creating a circular slab of bricks. Start up Bryce
and create a cylinder with a size of 102 in the X and Z directions
and 5 in the Y direction. Assign it to family 12. In the Materials palette, go to
Rocks and Stones and select Veiny Stone. Open the Materials
Lab and start adjusting the values as shown below.
|
|
|
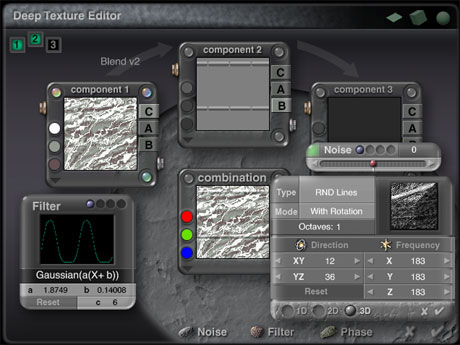
In the Deep Texture Editor, adjust
component 1 to match the values given below.
|
|
|
Set the noise and filter for component 2
as shown below.
|
|
|
Accept the values and try a test render
from a side view of the brick slab cylinder. You should get
something similar to the image below. Save
your work as a scene file for later use. I called mine Slab.br5. This file will be merged into the scene file for
each story later on.
|
|
|
Making a
Column
Press CTRL+N to
start fresh in Bryce. Create a column out of 5 primitives
using the values in the tables below. If a value isn't
mentioned in the table, assume it to be zero. |
|
|
|
|
Object
|
Family
|
Y Position
|
X Rotation
|
X Size
|
Y Size
|
Z Size
|
Radius
|
|
Cube
|
5
|
6
|
0
|
10
|
2
|
10
|
|
|
Torus
|
6
|
8
|
90
|
10
|
10
|
2
|
256
|
|
Cylinder
|
7
|
38
|
0
|
6
|
60
|
6
|
|
|
Torus
|
8
|
62
|
90
|
10
|
10
|
2
|
256
|
|
Cube
|
9
|
64
|
0
|
10
|
2
|
10
|
|
|
|
|
Group the 5
primitives together and place them into Family 10. Apply the
Veiny Stone material and save the scene as BotCol.br5.
|
|
|
The Bottom Story
|
|
|
Now we're going
to build a simple foundation for our tower. Press CTRL+N to
start fresh in Bryce. Delete the ground plane so it doesn't
get in the way later on. Create the foundation from 2 primitives
using the values in the table below.
|
|
|
|
Object
|
Family
|
Y Position
|
X Rotation
|
X Size
|
Y Size
|
Z Size
|
Radius
|
|
Torus
|
2 |
1 |
90 |
122 |
122 |
2 |
16 |
|
Cylinder
|
3 |
2.5 |
0 |
120 |
5 |
120 |
|
|
|
|
Next we are
going to add the column we saved earlier and multi-replicate it
into a ring of 15 columns. Click on File>Merge BotCol.br5
to add the column to the present scene.
With the column
(family 10) selected, open the Attributes
window, and place the column at X = -54 and Z = 0. Apply a check to Show Origin
Handle and place the Origin at X and Z =
0. Now, click on multi-replicate. Were going to have
15 columns and we already have 1, so set the quantity to 14 in the
multi-replicate pop-up menu. Set the Y Rotate to 24 degrees
(because 360/15=24). Leave the offsets at 0 and press
enter. You should have an even ring of columns around the
base.
|
|
|
Now we are
going to add the brick slab we saved earlier and stack it up to
make the outer shell of the tower.
Click
on File>Merge Slab.br5 to import the object and set the Y
offset to 7.5 so it rests on top of the foundation slab.
Multi-replicate the slab by setting the quantity to 11 with a Y
offset of 5. This will give you a stack of 12 slabs.
If you want, you can replicate the slab using a Y rotation of 6
degrees to stagger the bricks. Since we used parametric
scaling on the brick texture, I found I got better results by
selecting each slab, going into the Materials Lab, and setting the
Y rotation for the material 2 degrees higher than that value for
the preceding slab. In other words, the Y rotations for the
12 slab layers (starting from the bottom) will be
0,2,4,6,8,10,12,14,16,18,20,22.
|
|
|
Next, we'll make the
tower hollow by adding a negative cylinder to be grouped later
with the slabs. Create a cylinder with negative attributes
and a Y position of 41. Set the X and Z size to 78.75 and
the Y size to 75. Assign it to family 13.
|
|
|
To make the
door, we'll use the primitives described in the table below.
Apply the same texture to the flat end of the cylinder that was
used for the brick slabs, but use spherical mapping for a
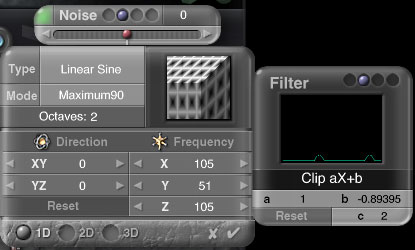
decorative effect. You'll also want to increase the
amplitude of component 2's filter in the Deep Texture Editor to
enhance the chiseled effect. |
|
|
|
Object
|
Family
|
Attrib |
X
Position |
Y Position
|
Z Rotation
|
X Size
|
Y Size
|
Z Size
|
| Cube |
19 |
Negative |
45 |
20.25 |
0 |
15 |
30 |
15 |
| Cylinder |
20 |
Positive |
46 |
35.25 |
90 |
15 |
11.67 |
14.8 |
| Cube |
21 |
Positive |
45 |
34.75 |
0 |
14 |
1 |
14.8 |
|
|
|
Now we add the
bricks for the arches to the top of this section. Add 2 more
circular brick slabs by copying the top 2 in the stack you just
replicated. Apply the values given in the table below.
Set the Y rotations for the materials to 3 degrees for the lower
slab and 6 degrees for the upper one. Also add the 2 toruses
as shown in the table.
|
|
|
|
Object
|
Family
|
Attrib |
Y Position
|
X Rotation
|
X Size
|
Y Size
|
Z Size
|
Radius |
| Cylinder |
14 |
Positive |
67.5 |
0 |
120 |
5 |
120 |
|
| Cylinder |
15 |
Positive |
72.5 |
0 |
120 |
5 |
120 |
|
| Torus |
16 |
Positive |
76.1 |
90 |
122 |
122 |
2 |
32 |
| Torus |
16 |
Positive |
76.1 |
90 |
122 |
122 |
2 |
200 |
|
|
|
To cut holes
for the arches, create a negative cylinder with X, Y, and Z
size of 15. Assign this object to family 18. Set the Z
rotation to 90 degrees. Set the X position to 54 and the Y
position to 65. Apply a check to Show Origin
Handle and place the Origin at X and Z =
0. Multi-replicate the arch holes with quantity set to 14
and Y Rotate set to 24 degrees. This should produce a ring
of 15 cylinders between the column tops.
|
|
|
To build the
inlays that are set into the wall between the arches, we'll create
a textured object that will be replicated around the
building. Create the cubes using the values given in the
table below. Apply the Classic Checkerboard texture using
the Object Space mapping mode with a scale of 10% for texture size
in X, Y, and Z. |
|
|
|
Object
|
Family
|
Attrib |
X Position
|
Y Position
|
X Rotation
|
X Size
|
Y Size
|
Z Size
|
| Cube |
22 |
Positive |
48 |
65 |
45 |
8 |
8 |
8 |
| Cube |
22 |
Positive |
48 |
65 |
-45 |
9 |
6 |
6 |
| Cube |
22 |
Positive |
48 |
65 |
45 |
10 |
4 |
4 |
| Cube |
22 |
Positive |
48 |
65 |
-45 |
11 |
2 |
2 |
|
|
|
Group the
inlay cubes and place the Origin Handle at X and Z =
0. Multi-replicate the arch holes with quantity set to 14
and Y Rotate set to 24 degrees.
|
|
|
Finally (for
this level) we'll put all of these pieces together. First
save your work so you can easily backtrack if you need to change
something later on. I saved mine as BotLevel.br5.
Now, select the outer wall (family
12), the inner wall (family 13), the door parts (families 19, 20,
21) and the inlay cubes (family 22). Group the selected
families together.
De-select all, then select the arch
brick slabs (families 14,15) and the arch holes (family 18) and
group them together.
Now, select all (CTRL + A) and assign
everything to family 23. A test render should look like the
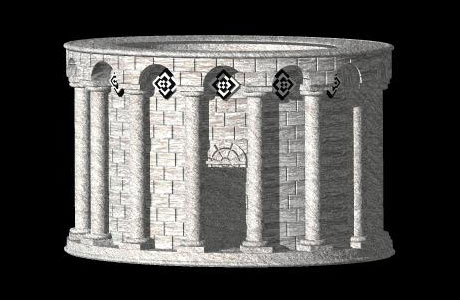
image at the top of this section. Save your work as BotLevelGrp.br5.
|
|
|
Generic Middle Level

|
|
|
The middle levels don't need
a foundation slab since each one will sit on the top of the level
beneath it. The brick slabs are not as wide and there are
only 8 instead of 12. There are 30 columns instead of 15 and
the columns are smaller. There are also 30 arches instead of
15, and the arches are narrower.
Press CTRL+N to
start fresh in Bryce and delete the ground plane. Import the
brick slab using the File>Merge command. Change the X and
Z size from 102 to 80. Use the Multi-replicate command with
quantity set to 7 and Y offset set to 5 to create a total of 8
stacked slabs. These are all positive and in family
12. In the Materials Lab, set the Y rotations for the 8 slab layers (starting from the bottom)
to 0,1,2,3,4,5,6,7.
Create a column using values
given in the table below. |
|
|
|
Object
|
Family
|
Y Position
|
X Rotation
|
X Size
|
Y Size
|
Z Size
|
Radius
|
|
Cube
|
5
|
.5
|
0
|
5
|
1
|
5
|
|
|
Torus
|
6
|
1.5
|
90
|
5
|
5
|
1
|
256
|
|
Cylinder
|
7
|
20
|
0
|
3
|
40
|
3
|
|
|
Torus
|
8
|
28.7
|
90
|
5
|
5
|
1
|
256
|
|
Cube
|
9
|
29.7
|
0
|
5
|
1
|
5
|
|
|
|
|
Group the 5
parts of the column together and place it in family 10.
Set the column's X position to -54
and multi-replicate it with a quantity of 29 and a Y rotation of
12 degrees to produce a ring of 30 columns.
Make the middle level hollow by adding a negative cylinder to be grouped later
with the slabs. Create a cylinder with negative attributes
and a Y position of 20. Set the X and Z size to 70 and
the Y size to 50. Assign it to family 13.
Add the door using the values in the
table below. |
|
|
|
Object
|
Family
|
Attrib |
X
Position |
Y Position
|
Z Rotation
|
X Size
|
Y Size
|
Z Size
|
| Cube |
19 |
Negative |
38 |
11.5 |
0 |
12 |
22.4 |
11.2 |
| Cylinder |
20 |
Positive |
46 |
22.7 |
90 |
11.2 |
7.5 |
11.2 |
| Cube |
21 |
Positive |
45 |
22.7 |
0 |
12 |
.75 |
11.2 |
|
|
|
Add the brick
slabs for the arches and the roof disks using the table below.
|
|
|
|
Object
|
Family
|
Attrib |
Y Position
|
X Rotation
|
X Size
|
Y Size
|
Z Size
|
Radius |
| Cylinder |
14 |
Positive |
32.5 |
0 |
114.1 |
5 |
114.1 |
|
| Cylinder |
15 |
Positive |
37.5 |
0 |
114.1 |
5 |
114.1 |
|
| Torus |
16 |
Positive |
41 |
90 |
116 |
116 |
2 |
32 |
| Torus |
16 |
Positive |
41 |
90 |
116 |
116 |
2 |
200 |
|
|
|
Add the holes
arches using the table below.
|
|
|
|
Object
|
Family
|
Attrib |
X Position
|
Y Position
|
X Size
|
Y Size
|
Z Size
|
| Cylinder |
18 |
Negative |
54 |
32.18 |
8 |
6 |
5.5 |
| Cube |
18 |
Negative |
54 |
29.18 |
8 |
6 |
5.5 |
|
|
|
Multi-replicate
the arch holes with a quantity of 29 and a Y rotation of 12
degrees.
Save your work as MidLevel.br5.
Group the parts of the middle level the same way as the bottom
level was grouped. If all went well, a test render should
look like the image at the top of this section. Assign all parts to family 24 and
save your work as MidLevelGrp.br5.
|
| |
|
The Top Level
|
|
|
The top level
is distinguished by the presence of railings, bells, and arches to
hold the bells.
Press CTRL+N to
start fresh in Bryce and delete the ground plane. Make the
base of the top level by creating a torus with a radius of
512. Set the X and Y size to 110 and the Z size to 10.
Rotate the torus 90 degrees on the X
axis and set the Y position to 5.52. Set the family to 2.
Import the
brick slab (family 12) and change the X and
Z size from 102 to 60. Set the Y position to 12.92. Use the Multi-replicate command to create a total of 8
stacked slabs as you did with the middle level. In the Materials Lab, set the Y rotations for the 8 slab layers (starting from the bottom)
to 0,1,2,3,4,5,6,7.
Create a column using values
given in the table below. |
|
|
|
Object
|
Family
|
Y Position
|
X Rotation
|
X Size
|
Y Size
|
Z Size
|
Radius
|
|
Cube
|
5
|
10.5
|
0
|
5
|
1
|
5
|
|
|
Torus
|
6
|
11.5
|
90
|
5
|
5
|
1
|
256
|
|
Cylinder
|
7
|
25
|
0
|
3
|
30
|
3
|
|
|
Sphere
|
3 |
37.95
|
0 |
3 |
3 |
3 |
|
|
Torus
|
8
|
38.45
|
90
|
5
|
5
|
1
|
256
|
|
Cube
|
9
|
39.45
|
0
|
5
|
1
|
5
|
|
|
|
|
Group the 5
parts of the column together and place it in family 10.
Set the column's X position to -32.5
and multi-replicate it with a quantity of 17 and a Y rotation of
20 degrees to produce a ring of 18 columns. Six of these
columns will be removed later after the bells and railings have
been added.
Make the middle level hollow by adding a negative cylinder to be grouped later
with the slabs. Create a cylinder with negative attributes
and a Y position of 25. Set the X and Z size to 50 and
the Y size to 51. Assign it to family 13.
Add the brick slabs for the arches and the
toruses for the roof disks using the table below. |
|
|
|
Object
|
Family
|
Attrib |
Y Position
|
X Rotation
|
X Size
|
Y Size
|
Z Size
|
Radius |
| Cylinder |
14 |
Positive |
42.5 |
0 |
70 |
5 |
70 |
|
| Cylinder |
15 |
Positive |
47.5 |
0 |
70 |
5 |
70 |
|
| Cylinder |
11 |
Negative |
45 |
0 |
64 |
10 |
64 |
|
| Torus |
16 |
Positive |
50 |
90 |
72 |
72 |
1 |
32 |
| Torus |
16 |
Positive |
50 |
90 |
70 |
70 |
2 |
150 |
| Torus |
16 |
Positive |
50 |
90 |
52 |
52 |
1 |
32 |
|
|
|
Make the arch
holes by creating a negative cylinder with an X and Z size of 6 and a Y size of 10. Set the family to 18. Rotate it -90
degrees on the X axis and position it at X = 0, Y = 40, and Z =
-34. Multi-replicate it with a quantity of 17 and a Y rotation of
20 degrees to produce a ring of 18 cylinders.
|
|
|
Make the
arches for the small bells using the values in the table below and
group the cylinder and cube into family 5. Multi-replicate this group with a quantity of 5
and an angle of 60 degrees. Select family 5, group it
again, and rotate it on the Y axis 10 degrees. |
|
|
| Object |
Att |
X Pos |
Y Pos |
Y Rot |
Z Rot |
X Size |
Y Size |
Z Size |
| Cylinder |
Negative |
15.5 |
37.5 |
0 |
90 |
5 |
31 |
5 |
| Cube |
Negative |
15.5 |
33.75 |
90 |
0 |
5 |
7.5 |
31 |
|
|
|
Make the arches for the large bells
using the values in the table below and group the cylinder and
cube into family 6. Multi-replicate this group with a quantity of 5
and an angle of 60 degrees. Select family 6, group it
again, and rotate it on the Y axis 40 degrees. When you're
done, group 5,6,11,12,13,14,15,18 together. |
|
|
| Object |
Att |
X Pos |
Y Pos |
Y Rot |
Z Rot |
X Size |
Y Size |
Z Size |
| Cylinder |
Negative |
17.5 |
30.5 |
0 |
90 |
10 |
35 |
10 |
| Cube |
Negative |
17.5 |
23.0 |
90 |
0 |
10 |
15 |
35 |
|
|
|
You'll notice
that the six negative stones used to cut the arches for the large bells each
have a column standing directly in front of it. In these six
columns, delete the cylinder, the bottom torus, and the bottom
cube.
|
|
|
Now group
5,6,11,12,13,14,15,18 together. If everything works, a test
render should show the top level with everything but the bells and
the railings. |
|
|
Below is the
table showing the components of one of the small bells.
Create these components in family 19 and group them
together. Multi-replicate this group with a quantity of 5
and an angle of 60 degrees. Select family 19, group it
again, and rotate it on the Y axis 10 degrees. |
| Obj |
Att |
X Pos |
Y Pos |
Z Pos |
X Rot |
X Size |
Y Size |
Z Size |
Rad |
Texture |
| Torus |
N |
27.5 |
35.56 |
0 |
90 |
7.52 |
7.52 |
5.19 |
350 |
Bronze |
| Sphr |
P |
27.5 |
32.69 |
0 |
0 |
4 |
6 |
4 |
|
Bronze |
| Sphr |
N |
27.5 |
31.84 |
0 |
0 |
4 |
6 |
4 |
|
Bronze |
| Cube |
P |
27.5 |
36.19 |
0 |
0 |
0.5 |
0.5 |
5 |
|
Iron |
| Cyl |
P |
27.5 |
34.18 |
0 |
0 |
0.25 |
3.5 |
0.25 |
|
Iron |
| Sphr |
P |
27.5 |
32.25 |
0 |
0 |
0.75 |
0.75 |
0.75 |
|
Iron |
| Sphr |
P |
27.5 |
35.89 |
-0.35 |
0 |
0.75 |
2 |
0.75 |
|
Iron |
| Sphr |
P |
27.5 |
36.09 |
0 |
0 |
0.75 |
2 |
0.75 |
|
Iron |
| Sphr |
P |
27.5 |
35.89 |
0.35 |
0 |
0.75 |
2 |
0.75 |
|
Iron |
| Torus |
N |
27.5 |
32.69 |
0 |
90 |
4.05 |
4.05 |
0.25 |
16 |
Bronze |
|
|
Below is the
table showing the components of one of the large bells.
Create these components in family 20 and group them
together. Multi-replicate this group with a quantity of 5
and an angle of 60 degrees. Select family 20, group it
again, and rotate it on the Y axis 40 degrees.
|
| Obj |
Att |
X Pos |
Y Pos |
Z Pos |
X Rot |
X Size |
Y Size |
Z Size |
Rad |
Texture |
| Torus |
N |
27.5 |
27.63 |
0 |
90 |
15.04 |
15.04 |
10.38 |
350 |
Bronze |
| Sphr |
P |
27.5 |
21.88 |
0 |
0 |
8 |
12 |
8 |
0 |
Bronze |
| Sphr |
N |
27.5 |
20.19 |
0 |
0 |
8 |
12 |
8 |
0 |
Bronze |
| Cube |
P |
27.5 |
28.88 |
0 |
0 |
1 |
1 |
10 |
0 |
Iron |
| Cyl |
P |
27.5 |
24.87 |
0 |
0 |
0.5 |
7.0 |
0.5 |
0 |
Iron |
| Sphr |
P |
27.5 |
21.0 |
0 |
0 |
1.5 |
1.5 |
1.5 |
0 |
Iron |
| Sphr |
P |
27.5 |
28.28 |
-0.7 |
0 |
1.5 |
4.0 |
1.5 |
0 |
Iron |
| Sphr |
P |
27.5 |
28.68 |
0 |
0 |
1.5 |
4.0 |
1.5 |
0 |
Iron |
| Sphr |
P |
27.5 |
28.28 |
0.7 |
0 |
1.5 |
4.0 |
1.5 |
0 |
Iron |
| Torus |
N |
27.5 |
21.88 |
0 |
90 |
8.1 |
8.1 |
0.5 |
16 |
Bronze |
|
|
Now we'll
build the lower railing for the top level and put it into family
21. Use the values in the table below and apply an iron
texture. Group the pieces together and multi-replicate with
a quantity of 29 and a Y rotation of 12 degrees.
|
|
|
| Object |
X
Pos |
Y
Pos |
Z
Pos |
X
Rot |
Y
Rot |
X
Size |
Y
Size |
Z
Size |
| Sphere |
52.96 |
14.25 |
0 |
0 |
0 |
1.6 |
1.05 |
1.6 |
| Cylinder |
52.4 |
12.85 |
-5.54 |
90 |
5.72 |
0.53 |
11.14 |
0.53 |
| Cylinder |
52.4 |
10.06 |
-5.54 |
90 |
5.72 |
0.53 |
11.14 |
0.53 |
| Cylinder |
52.96 |
10.76 |
0 |
0 |
0 |
0.53 |
6.98 |
0.53 |
|
|
|
Now we'll
build the upper railing for the top level and put it into family
22. Use the values in the table below and apply an iron
texture. Group the pieces together and multi-replicate with
a quantity of 17 and a Y rotation of 12 degrees.
|
|
|
| Object |
X
Pos |
Y
Pos |
Z
Pos |
X
Rot |
Y
Rot |
X
Size |
Y
Size |
Z
Size |
| Sphere |
32.93 |
57.48 |
0 |
0 |
0 |
1.65 |
1.05 |
1.65 |
| Cylinder |
31.96 |
56.08 |
-5.68 |
90 |
9.61 |
0.55 |
11.6 |
0.55 |
| Cylinder |
31.96 |
56.08 |
-5.68 |
90 |
9.61 |
0.55 |
11.6 |
0.55 |
| Cylinder |
32.93 |
53.99 |
0 |
0 |
0 |
0.55 |
6.98 |
0.55 |
|
|
|
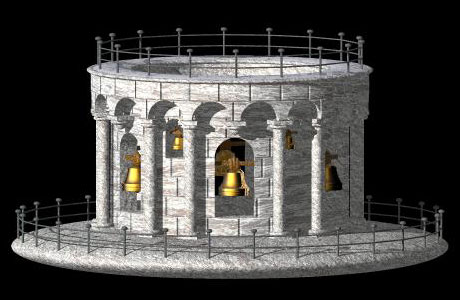
A test render should
look like the image at the top of this section. Assign all parts to family
25 and
save your work as TopLevelGrp.br5. |
|
|
Press CTRL+N to
start fresh in Bryce and delete the ground plane. Using the
table below, merge the previously built files to build the tower,
level by level. When you're through, group all 8 levels into
family 2 and save your work as TowerPisa.br5. |
|
|
|
Level |
File
to Merge |
Family |
Y
Position |
Y
Rotation |
|
1 |
BotLvlGrp.br5 |
2 |
39.0 |
0 |
|
2 |
MidLvlGrp.br5 |
3 |
96.6 |
45 |
|
3 |
MidLvlGrp.br5 |
6 |
138.5 |
0 |
|
4 |
MidLvlGrp.br5 |
7 |
180.2 |
45 |
|
5 |
MidLvlGrp.br5 |
8 |
227.5 |
0 |
|
6 |
MidLvlGrp.br5 |
9 |
265.2 |
45 |
|
7 |
MidLvlGrp.br5 |
10 |
307.3 |
0 |
|
8 |
TopLvlGrp.br5 |
11 |
352.5 |
0 |
|
|
|
Now
that your tower is built, open a new scene by pressing CTRL + N
and create the landscape you want to put the tower into.
Remember to leave family 2 free. When the landscaping work
is done, incorporate the tower into the scene by merging
TowerPisa.br5. For the finishing touch, apply a 5 degree
rotation to the tower along the X axis to make the tower lean. |
|
|
The Rest of
the Picture
The picture at the top of
this tutorial "The Tower and the Swans" was pretty
straight forward once the tower was built. The sky was
produced using the Bit Of Snow sky preset and tweaking the colors
a bit. The trees were made using the Bryce 5 Tree Lab.
The swans were made from a posable model by Bloodsong at
3dMenagerie.
|
|
|
Wrapping
Things Up
That's
it for this time around. If you check out some of the sites
listed below, you'll see that our model has room for a lot of
extra details, particularly in the area of ornamental carvings and
the building's interior staircase. How much more you put
into the model depends on how much close-up work you'll be doing
with it.
Until next time, Arrivederci! |
| |